Let me start today’s post by saying that this Easy Dutch Oven Bread is not a sourdough bread. It is an ordinary yeasted white bread, that one would ordinarily bake in a loaf tin. There seems a general thought that breads baked in Dutch Ovens are either no-knead breads or sourdough breads. Take a look at on the net at breads baked in Dutch Ovens. The truth is otherwise. If you have a Dutch Oven, you use it to bake regular breads and they come out quite well.

If the term Dutch oven is a little confusing, it is the name in the US for a thick-walled cooking pot with a tight-fitting lid. Outside the US, they’re also known as Casserole Dishes or Casseroles. These have been used for years for cooking. They’re usually made of cast iron, cast aluminium, ceramic or enamel coated.
The thick walls of the Dutch Oven distributes heat evenly across the pot and retains it well. They’re good for slow cooking and allow bread to bake evenly. The tight fitting lid allows heat to stay inside and produces steam that cooks the bread and gives it a good texture as well.
I love baking bread and have a Dutch Oven equivalent. Mine is a 240mm Prestige Gourmet Cast Iron Non-Stick Casserole. I believe they’re not available in India anymore but you can find other brands if you’re looking to buy one.

I find that regular bread dough takes on an interesting texture when baked in a Dutch Oven. It retains the structure and texture of crumb of regular bread yet takes on a slight chewiness of a no-knead or sourdough bread. The bread also develops a beautiful crust reminiscent of no-knead or sourdough bread. That’s a win-win situation in my books, especially if you have family who are not very keen on a very chewy texture in their bread.
The kneading, resting/ proofing process is pretty much the same as for regular bread. You can pretty much go from ingredients to baked bread in about 3.5 hours, depending on ambient temperature where you live. You can also choose to let the dough do the first rise in the fridge overnight for better flavour, if you prefer. I have baked this bread pretty much every way it can be baked and it works every time.
If you do not have a Dutch Oven or Casserole, let that not stop you from baking this bread. Just shape the dough and bake it in a regular loaf pan, cake tin or as rolls/ buns. I have done so many times as you can see from my photographs. You don’t have to score the dough if you’re not comfortable doing it. I find scoring lets the bread bake better. The added bonus is that it looks pretty. Truly, this is a bread that begs to be baked.

You can substitute 2 cups of the all-purpose flour with whole wheat flour for a 50% whole wheat bread. You can use the egg or leave it out all together. I have baked both ways and the bread turns out fine. If you don’t use the egg, add a couple of tablespoons of milk to compensate for fluid volume. You can use oil instead of butter, and substitute milk with water or a non diary milk to veganize this recipe. You can flavour the bread if you like. Try using cumin seeds, or herbs of your choice. Feel free to experiment.
A lot of people will tell you that you need that you need to start baking by pre-heating the Dutch Oven. This can get a bit difficult as you try to maneuver shaped dough into the hot dish. You might deflate the shaped and proofed dough or worse, burn yourself trying it. Bread bakes equally well if you start with it in a cold Dutch Oven.
I don’t bother pre-heating my Dutch Oven for baking bread. After shaping the dough for the second rise/ proof, I place it in the parchment lined Dutch Oven. After the second rise/ proofing, I score it and put into the pre-heated oven to bake.
Easy Dutch Oven Bread
Ingredients
- 1/2 cup warm milk
- 1/4 tsp sugar
- 1 1/2 tsp instant yeast
- 4 cups all-purpose flour
- 1 tsp salt
- 1 egg lightly beaten (optional)
- 25 gm butter melted
- 1 cup water approximately
Instructions
- Mix the yeast, warm milk and sugar in a small bowl. Leave for 5 to 10 minutes to proof and the mixture is frothy. You can knead the dough by machine or hand. As always, I use my food processor on low speed and finish off the kneading by hand.
- Put all the ingredients, including the proofed yeast mixture, in the bowl of your machine except the water. Pulse a couple of times. Then add about half the water. Knead, adding as much more of the water as required, till you hav, smooth and elastic dough.
- Shape it into a ball and place it in an oiled bowl, rolling it first, to coat it completely with oil. Cover loosely and let it rise until double in volume. The ambient temperature will determine how long it takes to double. It takes about 1 1/2 hours in my warm tropical climate here.
- Turn out the dough onto a lightly floured working surface. Gently deflate the dough and reshape it into a tight ball. Place it in a parchment lined Dutch Oven. Cover loosely and let it rise for about 45 minutes or till it is almost double in size.
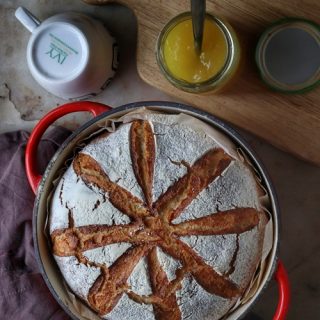
- Dust the top of the dough lightly and uniformly with flour. Using a sharp blade or lame, quickly score the top of the dough. Scoring dough helps it cook better and it looks pretty. As the bread bakes, it will expand and those scored lines will become more visible.
- Cover the Dutch Oven tightly with the lid and place it in a pre-heated oven at 230C (450F). Bake for about 35 to 40 minutes and then remove the lid. Let it continue baking for another 10 minutes or so till it is darker in colour and has a crisper crust.
- Take the bread out and let it cool completely wrapped in a cotton kitchen towel. Do not slice the bread for at least an hour or two after it comes out of the oven. This is because it continues cooking for a while as soon as it comes out of the oven. If you cut it while still warm, it will have a sticky and almost uncooked texture.

Leave a Reply