Hello there. I’m back again after another long, long break. Today, I’m posting a Multigrain Sourdough Sandwich bread that I baked in May! That’s because we’ve spent all of May, June and a bit of July on some renovations around the house. We’ve had workmen in out of the house and blogging has really been way down on my list of things to do. We have spent the first half of this month just putting the house back together.
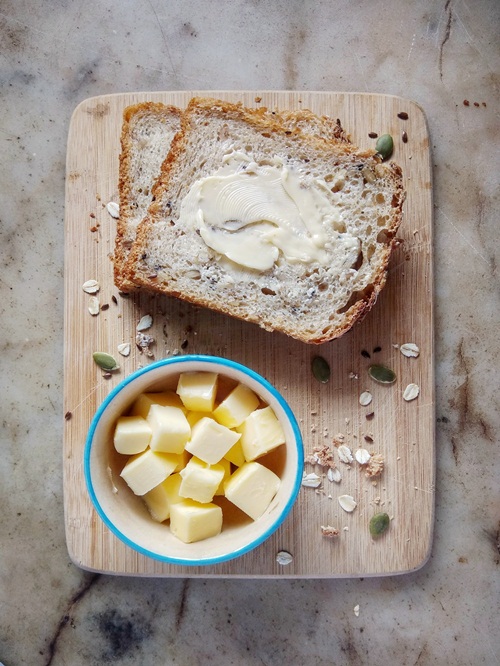
Now, I’m ready to get back to the blog though and I’m starting with May’s Bread Baking Babes bread of the month. Karen picked a Multigrain Sourdough Sandwich Bread from Artisan Sourdough Made Simple by Emilie Raffa . As she remarked, this a great way to use your sourdough starter to make a soft pan bread that’s perfect for making toast and sandwiches. That’s what Karen said about this month’s bread and she’s right.
Many of us have think of sourdough breads as these hearty loaves of chewy and crusty bread with really open or “holey” crumb. While that is true, one can use sourdough starter to make just about any kind of bread. Sourdough starter is nothing but a wild yeast culture. In fact, it can be used to make anything that might be made with regular yeast.
This bread really isn’t difficult to make, and it is easier than regular sourdough loaves. Shaping the dough isn’t really a problem because it is not a very high hydration or wet dough. It is also baked in a loaf tin. This bread will take pretty much most of the day to bake, assuming you’re starting with a freshly fed and active starter.
There are two ways/ time lines you can choose to bake the bread. Start on the first day, by mixing the dough at night. Let it rise overnight and then bake it the next morning. I personally prefer this method because the dough does a slow rise in the fridge while I sleep. The second way is to start early morning, let the dough rise through the day. Then bake it late in the evening.
I usually have a hibernating sourdough starter in the fridge. However at this particular time mine had been in there for so long I decided to start with a new starter. I started fresh with an active 100% hydration starter (made with equal volumes of whole wheat flour and water). The original recipe asks for bread flour but I used all-purpose flour. You can use a readymade grain and seed mix if you prefer. I used broken corn, barley, oats, flax seeds, pumpkin seeds and watermelon seeds for my soaker.
The Bread Baking Babes (BBB) is a closed group, but you’re most welcome to bake with us as a Bread Baking Buddy. Bake this month’s bread using the given recipe. Post it on your blog before the 28th of this month. Mention the Bread Baking Babes and link to her BBB post in your own post. Then e-mail Karen with your name and the link to the post, or leave a comment on her blog post with this information.
Multigrain Sourdough Sandwich Bread
Ingredients
For the Dough :
- 1/4 cup bubbly 100% hydration sourdough starter
- 1 1/4 cups warm water
- 1 tbsp honey
- 3 tbsp coconut oil
- 1/3 cup whole wheat flour
- 3 3/4 cups all purpose flour
- 1 1/4 tsp salt
For the Multigrain Soaker :
- 1/2 cup mixture of grains and seeds
- 1 cup hot water
- Rolled oats for topping the loaf optional
Instructions
- Mix the starter, water, honey, and oil, in a large bowl, with a dough whisk or fork. Add the flours and salt to this. Mix the dough by hand in the bowl to form a shaggy dough. Cover with a damp towel or plastic wrap and allow to rest for 30 minutes.
- While the dough is resting, mix your choice of grains and seeds, and hot water in a separate bowl. Let it sit for about 30 minutes. Drain the water thoroughly before using.
- Add the soaked and drained multigrains to the dough and knead to incorporate. The dough will be wet at first but will begin to come together. Do not add more flour or the texture of the bread will suffer.
- Cover the bowl with plastic wrap or a damp towel and let rise until doubled, about 5 to 8 hours, depending on your ambient temperature. I prefer to mix the dough at night and let it rise overnight in the fridge. I take the dough out first thing in the morning and let it come to room temperature before I proceed.
- Place the dough onto a lightly oiled surface and press it out to a rectangle. One side of the rectangle should be about 9 inched to fit into your loaf tin. Roll the dough into a log and place it into an oiled 9 inch by 5 inch loaf tin, seam side down. Cover loosely with oiled plastic wrap and let rest until the dough has risen upto one inch above the rim of the pan. This should take about 1 to 2 hours.
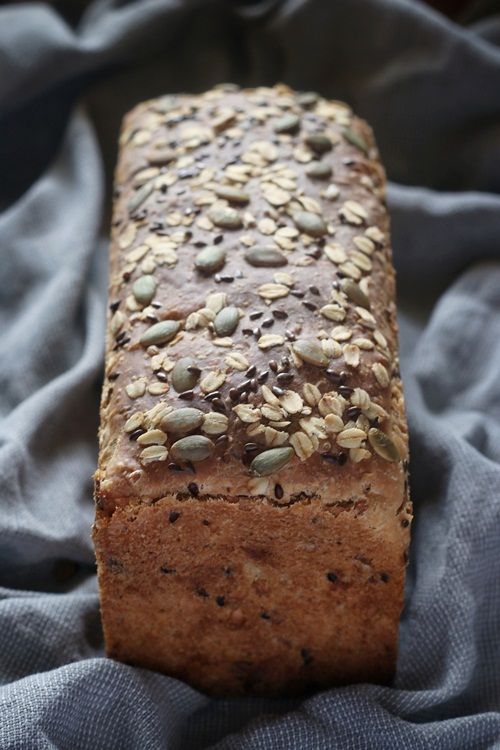
- If using oats (and/or seeds), brush the top of the loaf with water and lightly press them in.
- Pre-heat your oven to 230C (450F). Place the loaf tin in the oven on the centre rack the center rack. Reduce the temperature to 200C (400F) and bake for 50 to 60 minutes until done. Cool in the pan for 10 minutes and then turn it out to a wire rack to cool completely. Do not slice until the bread has cooled down well. You will be able to slice quite thin slices.
The Bread Baking Babes are –
Bread Baking Babe Bibliothécaire – Katie
Blog from OUR kitchen – Elizabeth
My Kitchen In Half Cups – Tanna

Thank you for this recipe. Can you tell me how long you usually knead it for? is just based on texture?
It is based on texture.
I’ve made this recipe twice with great results. The first loaf was a gift and the second for my husband and I. It’s delicious. I will be making this again. Thanks for sharing
Hello
Can I use wholemeal bread flour, instead of all purpose flour?
Hi, I followed the recipe but found that the dough was very dry at stage 1. I had to add water. What did I do wrong