I’ve heard of water proof make-up, water proof watches, water proof cameras, water proof mobile phones, but water proof bread had me stunned. That is until I took a good look at the Bread Baking Babes bread recipe for this month and realised that it was WATER-PROOFED bread! It pays to take to time and read recipes (and the heading said “Not Waterproof but Water-Proofed!”) carefully instead of skimming through stuff and giving oneself a shock.
I had never seen bread proofed and baked this way before by allowing bread dough an opportunity to rise under water. The recipe for this month’s BBB bread was selected by Ellefrom James Beard’s book Beard on Bread. According to the method outlined in this recipe, the first rise of the bread is done by wrapping the dough in a towel, tying it up well so water doesn’t get into the dough, and then submerging this “wrapped” dough in water. Once the dough has risen enough, the whole package floats up to the surface.
I wanted to understand the logic behind this method of bread dough proofing, so I went looking for some information on why bread dough had to undergo this form of water torture. It turns out that it really was no big deal at all and this was a method of letting dough rise used in the good old days when things weren’t so convenient and people did what they had to do with whatever was available on hand.
According to Elizabeth David, in her book “English Bread and Yeast Cookery“, Beard’s water proofing method (he is mentioned by name in her book, and the method really wasn’t his invention) was known in Victorian times. Later on, in the 1930s or so, it came to be known as the “Peggy Tub Bread” method. Apparently, on really hot days, this method was used to control the rise of dough and this method is better than using a refrigerator due to less extreme cold and higher humidity (not that everyone had refrigerators)
That begs the question as to what a “Peggy Tub” was. In the days when a washing machine was unheard of in England, a Peggy Tub (also known as a Dolly Tub) was a wash tub in which the washing was pounded by hand using a disc of wood at the end of a pole.
So when the washing tub was not being used to clean clothes, it was filled with cold water and parcels of dough wrapped in cloth towels were immersed in it. Then one went about one’s daily chores, and once the dough had risen to the top, because there was enough air trapped in the dough. It was then shaped and baked into bread.
Peggy Tub Bread was also referred to as Peggy Tub Cake probably because of the richness of the dough and it was really more of a yeasted cake than bread. The fat of choice originally was lard and some of the old recipes for this cake (or bread) also used candied peel, raisins, currants, nutmeg and ginger.

It seems that Andrew Whitley, in his book Bread Matters, also mentions having come across this method for proofing bread in some Russian cookbook written in the late 1800s where the dough was put into a bucket of water. The instructions apparently call for immersing the dough in water of the temperature of river water on a summer day (whatever that is in Russia) and is also why this method of proofing is also why some bakers refer to it as the Russian river bread floating test.
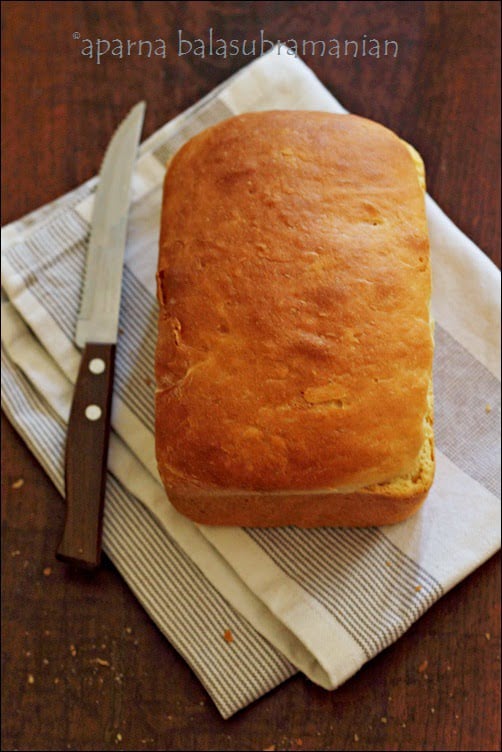
James Beard describes this bread and making it – “Although the dough in this recipe is fairly difficult to handle, it makes a very delicate, brioche like bread with a rich, buttery, eggy taste. It is extraordinarily good, ideal for tea or for eating with butter, jam and marmalade, and toasts extremely well. It can be wrapped in plastic and frozen for 3-4 weeks. The bread is called ‘water-proofed’ because the dough is submerged in a bath of water for the first rising.”
While I like brioche and who doesn’t, “eggy” didn’t sound very promising to me. We don’t particularly mind eggs in breads so long as they keep themselves disguised without announcing their presence to us. I had originally planned to make half the recipe, but many of the Babes said the recipe made two small loaves, so I decided to make the full recipe but with some changes based on suggestions from those who had already baked the bread.
A rather severe bout of viral fever and tonsillitis meant that I haven’t even been cooking let alone do any baking. Even though I had very good intentions of getting this bread made and posted in time for the 16th of the month deadline, that didn’t quite happen. Still as they say, better late than never.

I chose to make this bread a little less rich than suggested but please feel free to use the butter and eggs suggested in the original recipe.
I used two eggs instead of three, half the salt, cut down the butter to 75gms and used half the yeast suggested as we don’t like yeasty smelling/ tasting breads and 4 1/2 tsp of yeast seemed like way too much for about 4 cups of flour, even though it was for a rich dough!
I used water from the tap (filtered, not cold, and not warm) for the first rise since it didn’t make sense to me to use warm water for two reasons.
The first reason being, that using a water bath for this bread dough to rise suggests the need for a comparatively slower rise than at room temperature.
The second reason is that with the average daily temperatures here being around 34C, yeasted dough would rise pretty well on its own without the assistance of “warm” water.
A note on what to use to wrap the dough during its underwater rise. The suggestion in the recipe, is to use a cotton kitchen towel. I used a towel with a very close weave and found that not much of the risen dough (evn though it was a bit wet on the outseide when unwrapped) stuck to the wet towel.
This is probably because the close weave of the towel trapped the flour that was dusted on it and also prevented the wrapped dough from getting too soggy. So I would suggest using a towel with as tight a weave as you can find.
I also just loosely wrapped the dough well (my towel was large enough) and didn’t tie ithe parcel to allow the dough enough space to expand. Of course, it is important to warp this well, so that the dough doesn’t leak out!

If you do plan to make this bread, be prepared to work with very sticky dough, and wash one very messy towel with dough stuck to it. All this takes is soaking in some water, a couple of rubs by hand under running water to remove the dough and then a thorough wash and it should be clean. Also, do take a look at the original recipe before you plunge in (pun intended)!
Would I bake this bread again? I think I would because this recipe makes some pretty good br
ead – very soft and brioche-like without being too rich. However, I would choose the less exciting method of letting the dough rise without all the water-proofing business. I don’t see how dunking the dough in water and then scraping dough off the wet tea towel, and then having to take the trouble of washing it out, really makes all that much of a difference to this bread.
This recipe is adapted from Beard on Bread, 1973.

Water-Proofed Bread (It's Not Water Proof!)
Ingredients
- 2 1/4 tsps active dry yeast
- 1/2 cup water warm
- 1 tsp sugar granulated (to proof yeast)
- 1/4 cup sugar granulated
- 1/2 cup milk warm
- 75 gm butter
- 1 tsp salt
- 2 eggs
- 3 1/2 to 4 cups all-purpose flour
- flour tea More for dusting work surface and towel
Instructions
- If thereu2019s a chance to let a machine (my trustworthy food processor since I donu2019t have stand mixer) knead my dough, then I will use it. However the thought of having to clean up after it mixed sticky dough was daunting so I did this entirely by hand.
- Put in the yeast, the warm water, the 1 tsp sugar, and stir until the yeast dissolves. Allow this to proof for 5 minutes. Heat the milk with the butter and 1/4 cup sugar until lukewarm, then add to the yeast mixture. Add the salt and stir to blend well with a spatula.
- Add the eggs, one at a time, and again stir thoroughly. Then stir in 3 cups of flour, 1 cup at a time, vigorously. (I needed to use 3 1/2 cups of flour here.) You will have a very wet and sticky dough. Sprinkle about 1/2 cup of flour on your work surface and turn out the dough on this.
- Use a baker's scraper or large spatula to work in this last portion of flour and make the dough firmer. Scrape under the flour and the dough, lifting and folding inward. Repeat until the flour is well incorporated. You might need to add a little more flour but be a little conservative as too much flour will spoil the texture of the bread.
- When the dough is easy to handle, begin kneading by hand. Continue until the dough can be shaped. The process of kneading first with the scraper, and then by hand is very effective for delicate dough. In this case the dough will remain rather sticky, but don't worry about it.
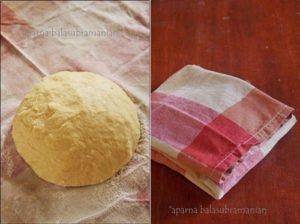
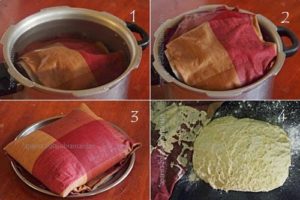
- Lift the dough, pat with flour, and place on a clean kitchen towel also sprinkled with flour. Wrap it and tie it in the towel, just as you would a package, but very loosely to allow for the expansion of the dough. I chose not to tie up the package because my towel was large enough to wrap it up well. Submerge this packet in a large bowl (I used my pressure cooker without the lid) filled with water from the tap (not cold or warm). It will sink.
- Let sit for about 35 to 40 minutes, or until it rises sufficiently to float on top of the water. This is the time required for the first rise of the bread dough.
- Lift the dough from the water and let the excess water drip off. Place the package on a towel so that all the excess water is absorbed. Un-wrap and turn out the dough onto a lightly floured surface. Again it will be quite sticky, so scrape off any dough that adheres to the towel. Knead and shape into two loaves, using both dough scraper and your hands.
- Thoroughly butter two small -medium sized loaf pans (I used 6u201d by 4 1/2" by 2u201d pans) and place one loaf in each pan. Cover, put in a warm, draft-free place, and let the dough rise slightly above the tops of the pans, or until almost doubled in bulk. My dough took about an hour to do so.
- Brush the tops of the risen loaves with cold water, and if you like slash the tops with a sharp knife. Bake them at 180C (350F) for about 25 to 35 minutes until the loaves have browned and sound hollow when tapped. When done, if you like remove the loaves from the pans and place them directly on the oven rack, to brown the bottom a little more and crisp the crusts. Cool on racks.
- Make sure the loaves are completely cool before slicing them.

This “water” method was also used in Romania. You can use cheesecloth, but a well-sealed and lightly-oiled “ziplock” bag works nicely too.
Thank you for sharing that.