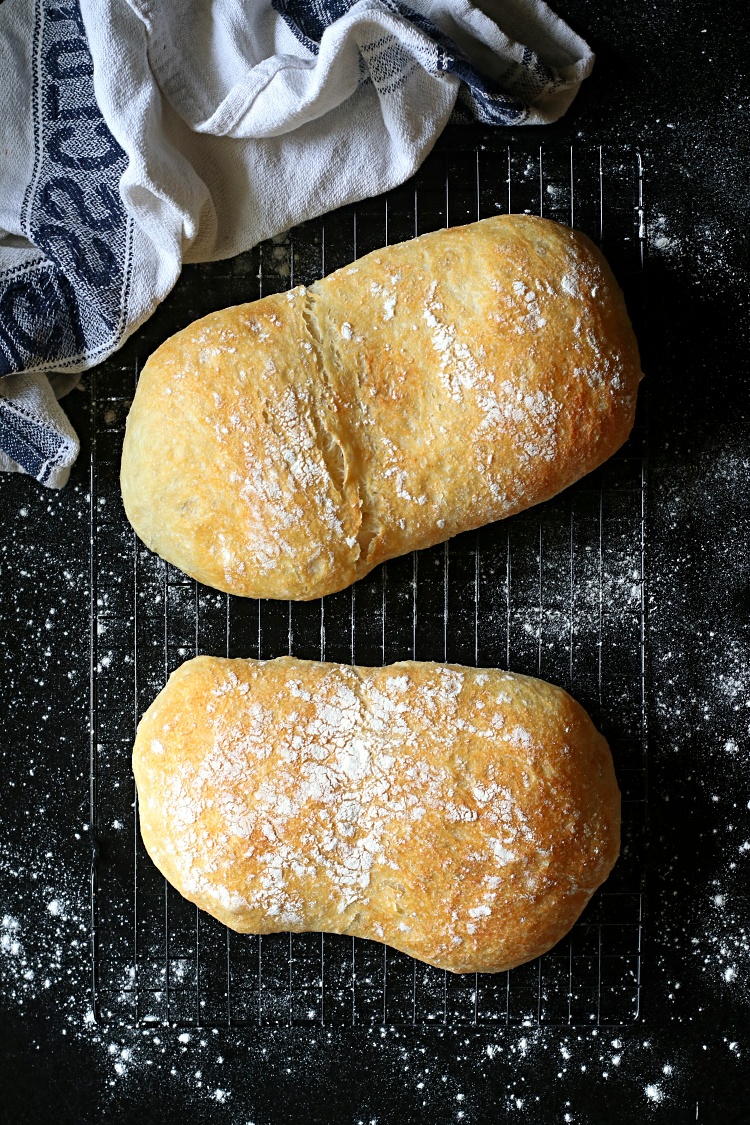
This month it was Kelly’s turn to pick a bread for us Bread Baking Babes and she chose the Pan de Cristal. A traditional loaf from the Catalan region of Spain, this bread is also called Glass Bread because of its texture. Sometimes referred to as Pa de Vidre, it is a longish rectangular bread without much height. Pan de Cristal is characterized by a very crisp crust and a thin, translucent honeycombed crumb.
Pan de Cristal is made from a high-hydration slack dough (about 90 to 100%). Fermentation and multiple folds convert the slack dough into a stiffer, smooth and silky dough. It is typically made with just four ingredients- flour, yeast, salt and water. A generous amount of olive oil is used to prevent the dough from sticking to its container. This oil is absorbed by the dough eventually, during folding.
Some say the Pan de Cristal was created in the 15th century while others claim it is more recent. One story says it came about when a baker in Barcelona mistakenly added more water to his bread dough.It is also claimed that the Pa de Vidre was created in 2004 by Jordi Nomen. He wanted to make a bread with a very light and airy crumb and so started experimenting with a high hydration dough. Though much like the Italian Ciabatta, this bread is different. The crust of the Pan de Cristal is thinner and crisper with a lighter and more open crumb. Each Pan de Cristal is roughly the size of a Ciabatta and can served and eaten much the same way.
I have baked a lot of bread but haven’t always been successful with very high hydration breads. This bread, though, turned out not as much a challenge as I expected considering how slack the dough is. One important factor in creating a good Pan de Cristal is to use a high protein flour. You can make your own bread flour by adding vital wheat gluten to all purpose flour. For 1 cup of bread flour, put 1 1/2 tsp of vital wheat gluten in a 1 cup measure. Top this up with all-purpose flour to make up to 1 cup. You can use a sourdough starter or yeast, or a combination of both. This dough does not require a long or overnight retardation.
High hydration doughs require the gluten in them to be strengthened This is normally done by kneading but here it is done by “coil” folding. This is done by lifting the slack dough in the middle and folding it over and under itself. This recipe needs about 4 to 5 coil folds done every 30 minutes or so till the dough gains strength and smoothness. Using a square dish or baking pan makes it easy to do the folds. Not handling the dough more than necessary and gently at that, is also important. This ensures that you get the desired honeycomb crumb.
Pan de Cristal loaves can be cut horizontally or vertically depending on what you want to use it for. They absorb flavour well and are typically used for tapas with spreads and toppings. You can make pretty good sandwiches too. A traditional favourite made with this bread is the “Pa amb Tomaquet” or bread with tomato. For this, the bread is toasted or not, then rubbed with a fresh tomato half so the juice is absorbed by the bread. Add a sprinkle of salt, a drizzle of virgin olive oil and enjoy.

I started the dough first thing in the morning after my cup of tea and had baked bread by a little after lunch time. This recipe, adapted from here, has frequent resting periods which require a little more active time for folding than the average bread dough. My rough timeline was as below. Remember to factor in about 5 to 10 minutes extra each time for folding. The timeline will change accordingly, and using a timer helps tremendously.
7.40 a.m. Mix the dough
8.00 a.m. Bowl fold
8.30 a p.m. Coil fold #1
9.00 a.m. Coil fold #2
9.30 a.m. Coil fold #3
10.00 a.m. Coil fold #4
10.30 a.m. Coil fold #5
11:50 a.m. Divide and shape dough
1:30 p.m. Bake
Depending on the strength of your dough, you may require to perform fewer or more than 5 coil folds. Once your dough feels quite strong and is easy to handle, you don’t need to do any more folding. Let the dough do a long rest before baking. This bread is best when baked on a stone. I use unglazed terracotta tiles in my oven. If you don’t have a stone, you may try using a rimless baking sheet. The crust of this bread softens quickly especially if you live in a humid climate like mine. You can re-crisp it just before serving by warming at 200C (400F) for about 8 to 10 minutes.
Pan de Cristal
Ingredients
- 2 cups water
- 4 cups bread flour
- 3/4 teaspoon instant yeast
- 2 teaspoons salt
- 1 tablespoon olive oil
Instructions
- Make the dough by mixing the water, flour, yeast, and salt very well, using a dough whisk or fork. The dough will be slack and wet. Use the olive oil to generously oil an approximately 10-inch by 7-inch or 9-inch square pan or dish. It doesn’t have to be oven safe since the dish is only for folding and resting the dough.
- Transfer the slack dough into the middle of the pan. Cover loosely and let it rest for about 20 minutes. Then do a bowl fold. Wet your hands and grab a section of dough from one side. Lift it up, then lightly press it down into the middle. Rotating the pan slightly, continue doing this 8 to 12 times more. Loosely cover and let the dough rest for 30 minutes.
- Now it’s time for a coil fold. Wet your hands and reach under the dough in the middle. Stretch the middle upward until the dough releases from the dish. Roll it forward off your hands, allowing it to fold over (or “coil”) on itself. This is called a coil fold. Rotate the dish 90 degrees (a quarter turn) and repeat the fold. Continue folding till the dough feels like it won’t stretch /elongate easily, usually four to five times initially.
- Cover loosely and let the dough rest for 30 minutes. Repeat the coil folds another 2 to 4 times with 30 minute intervals for resting the dough. Stop the coil folds once your dough feels strong, quite tight, smooth and doesn’t really stretch any more.
- For the last coil fold do only one or two folds if the dough feels relatively strong and tight. Cover loosely and let the dough rest for about 80 minutes.
- Treat the dough very gently as you do not want it to deflate. Carefully turn it out onto a heavily floured surface, maintaining the rectangle or square shape. Sprinkle a generous amount of flour on top of the dough, leaving no exposed sticky spots. Working gently with a dough scraper or sharp knife, divide the dough into equal four pieces. Gently transfer two pieces to a piece of parchment, leaving space between them. Similarly, transfer the other two pieces to another piece of parchment.
- Let them rest for about 1 1/2 to 2 hours, uncovered, at room temperature. They should feel light and airy with a few bubbles on the surface of each portion of dough when ready to bake.
- Carefully slide the dough onto the baking stone or sheet placed in the lower third of an oven preheated to 250C (475F). You can bake them two at a time. Bake the loaves for 15 minutes. Then transfer them directly onto a rack in the upper third of the oven for an additional 10 to 15 minutes.
- Leave the stone in place for the other two loaves. Moving them to the rack allows the baking stone or steel to become hot again in preparation for the next two loaves. The bread should be ready after a total of 25 to 30 minutes of baking, Let them cool completely on a rack before slicing.
The Bread Baking Babes are –
Bread Baking Babe Bibliothécaire – Katie
Blog from OUR kitchen – Elizabeth
My Kitchen In Half Cups – Tanna

It looks great! It was easier than I feared! We loved it with the tomato as well!
Drool reading about the tomato on horizontal slices of this! It would seem this bread was almost invented for that purpose.
That first photo is perfection of crust and crumb.
Interesting that this might have had a 15th century start.
Absolutely gorgeous, perfect crumb. Look at those lovely holes! And the bread with tomato sounds delicious.
I need to try this next summer for my tomato bread! It looks wonderful!
Thank you Karen.
The high hydration scared me, to be honest, but it worked out so well.
I would think so too, Tanna. It certainly seems the best way to eat this bread. I think the 15th century story is probably inaccurate….
Thank you. Yes, it’s great with tomato.
You certainly should. It is a lovely bread.
What a beautiful crumb! This was a fun challenge!