
In the last post in this series we took a look at how aperture affects light coming into a camera, exposure and depth of field. So let’s look at shutter speed today.
What is shutter speed?
A simple way of explaining shutter speed is the length of time the camera shutter stays open to allow light into the camera. Thus shutter speed controls how long the shutter in your camera stays open and how much light reaches the sensor.
With aperture, it is how big (or small) the aperture is that determines how much light comes into the camera.
Shutter speed is measured in seconds or fractions of seconds such as 1/8000, 1/4000, 1/1000, 1/500, 1/250, 1/125, 1/60, 1/30, 1/15, 1/8, 1/4, 1/2, 1, 2, 4, etc. The actual range and intervals of shutter speed available to you would depend on your camera. The larger the denominator, the faster the shutter speed, so and the shutter speed is faster and the shutter will stay open for less time at 1 /1000 than 1/125.
Also when you move from one full shutter speed setting to the next full lower shutter speed setting (not half stops) you reduce the light coming into the camera by half. If you move from a slower shutter speed to the next faster shutter speed setting, you increase the amount of incident light by double. So when you move from a shutter speed of 1/60s to 1/30s (faster to slower), you are reducing the amount of light coming into the camera by half and vice versa.
So if there is a lot of ambient light and you need less light in your photograph, you need to use a faster shutter speed so less light comes into the camera. Using the same logic, if it not so bright and you need more light in your photograph, then you will need a slower shutter speed so that the shutter remains open for longer to let more light into your camera.
If this seems confusing, think of the shutter like a window with curtains. When the sun is shining and it is very bright, you would close the curtains partially or completely (faster shutter speed for less light) to prevent all the light from coming in. Similarly, if you wanted your room to be brighter, you would open the curtains (faster shutter speed for more light) to let in more light.
So what it comes down to is “Faster shutter speed = Shutter is open for less time = Less light” and “Slower shutter speed = Shutter is open for longer time = More light”
Of course, the shutter speed setting has to work with corresponding aperture and ISO settings for the desired exposure, so you really cannot just think of only shutter speed when you’re setting your exposure.
Shutter speed does control the amount of light in a photograph but it does more than just that. You can use shutter speed to capture or freeze movement in a photograph. “Faster shutter speed = sharpness” while “Slower shutter speed = blur”
Good examples of this can be found in non-food photography where you might have seen waterfalls looking smooth, almost like liquid silk.
(aperture: f/ 2.8 and shutter speed: 1/60s)

(aperture: f/ 4.0 and shutter speed: 1/30s)

(aperture: f/ 25.6 and shutter speed: 1/15s)

(aperture: f/ 8.0 and shutter speed: 1/6s)

(aperture: f/ 11.0 and shutter speed: 1/4s)
Since we do not have to shoot waterfalls and the like in food photography and our food is never going to move unless it’s going to take a spill which you want to photograph, this aspect of shutter speed has comparatively little use in food photography.
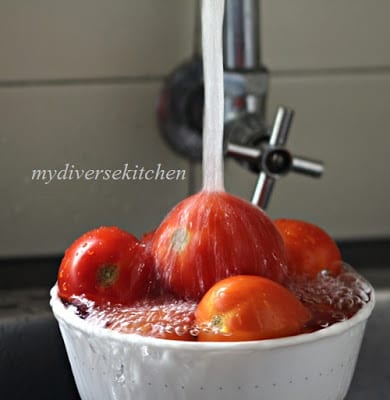
The closest I could get to a waterfall to show the relationship between different shutter speeds and freezing/ blurred motion was washing tomatoes under my kitchen tap!
In the above set of photographs, I have shot the same scene moving from a faster shutter speed (1/60s) to a slower shutter speed (1/4s) to show the difference in the movement of the water. Look at the point where the water is hitting the tomatoes and the bubbles below. As we move from a shutter speed of 1/60s towards 1/4s you can see that the water splashes and the bubbles lose their defined sharpness and become smooth and blurred.
The ISO setting in these set of photographs is 200. I started shooting with the aperture set at f/ 2.8 (the largest on my 100mm macro lens) and shutter speed at 1/60s. As I decreased the shutter speed progressively, I proportionately increased (smaller aperture, bigger f-stop) the aperture to maintain the same exposure.
As I mentioned in an earlier post on aperture in this series, there is a relationship between shutter speed and aperture and this is what you need to understand and learn very well if you want to use your dSLR on manual mode. The chart below explains it. If you follow any one number down you will see this inverse relationship between aperture and shutterspeed.

(Source: Flickr)
So let’s assume that you have a desired exposure at aperture f/ 4.0 and 1/60s shutter speed. You want to maintain this level of exposure but want to shoot at f/ 5.6 for a narrower DoF (depth of field). Understanding the relationship between aperture and shutter speed, it means if you move to f/ 5.6 it means you would have less light. So keeping the ISO constant you would need to increase the amount of light by going to the next full slower shutter speed setting of 1/30s to maintain the same exposure. (See this post on Exposure and the set of photographs of the pears, if you are confused about this)
In food photography, high shutter speeds can be used to freeze movement in “pours” or “splashes”. This includes capturing the movement (or freezing it) involved in pouring liquids like wine, juice, milk or water into a glass. You would also need it to if you would like to shoot syrup, honey or sauce being poured on pancakes or liquid splashes (like lemon wedges or strawberries splashing liquid)

(All at aperture: f/ 6.3, shutter speed: 1/1250s and ISO 800)

There are some things to keep in mind about shutter speed settings. Usually, in adequate ambient light situations, a shutter speed of about 1/60s or faster, would be good enough for most photography. If you are quite steady shooting holding your camera in your hands, then you should generally get sharp photographs without any blur at these shutter speeds.
However, at shutter speeds lower than 1/60s it is better to shoot using a tripod if you want photographs without blur. Of course, there are photographs which actually look better for the blur but that is a different topic.
The general consensus among food photographers is that it is best to shoot with a tripod and they are justified in saying so, as one tends to normally shoot at wide apertures. I am used to shooting hand-held as I find it more flexible, except in situations where I know I will not get sharp photographs without a tripod.
All the photographs in this post have been shot using a tripod.
You can control “camera shake” to some extent if your lens/ camera don’t have “image stabilisation” by choosing to shoot at a shutter speed that is higher than the reciprocal of the focal length of the lens you are using. That means if you are using a 50mm f/ 1.8 lens then a shutter speed of 1/60s and above should be good, with a 100mm lens a shutter speed of 1/125s would be right and with a 200mm focal length, 1 250s should be right.
Shooting in Shutter Speed Priority (Tv) mode:
There is a semi-automatic mode called the Shutter Speed Priority Mode in dSLR cameras. If you are not too bothered about the aperture setting but want to set your shutter speed at a definite value at a fixed ISO, then you can use this mode.

“Splash” (aperture: f/ 2.8, shutterspeed: 1/1600s and ISO: 2000)
This is especially useful if you want to capture movement over which you have no control (like the flight of a bird – not food, I know) then this is useful because you do not have the time to change settings. In food photography, this mode is not very useful because it is impossible to control the aperture settings in this mode.
I shot the above “splash” in Shutter Priority mode. It was an overcast day and I had to use whatever available natural light to shoot this, which wasn’t much. To freeze the splash, I used a fast shutter speed which meant there was less light coming into the camera. The camera compensated for this by opening up the aperture to f/ 2.8 (the minimum on my 100mm macro lens), which meant the splash wasn’t sharp enough at this wide open aperture. I still had to increase my ISO to add light (we’ll see this in the next post) upto 2000. This meant my photograph was very “noisy” or grainy, which I edited out somewhat using software.
Note: You might find there is some “noise” or a grainy effect in some of them.
This is because when you use a faster shutter speed (like 1/1000s or above) to freeze movement with a smaller aperture (like f/ 5.6 and above) to get a narrow depth of field (sharp picture throughout) you are reducing the light coming into your camera. You can do this with a flash or soft box or some artificial source of light.
I do not have any artificial sources of light suitable for photography so I had to increase my ISO which resulted in the “noise”. I’ll explain this in detail in my next post. So please excuse the “quality” of those photographs as I included them for illustrating the post.
If you have any questions please mail me or leave a comment at this post and I’ll do my best to answer it.
Useful Links:
Back To Basics – Shutter Speed
Photography 101: Shutter Speed Fun
Knowing Shutter Speed And How To Use It
Shutter Speed For Creative Photography
Shutter Priority Mode: A Beginner’s Guide
Aperture And Shutter Priority Modes
So Far In This Series:
Food Photography Basics #1 : Do I Need A DSLR To Get Good Photographs?
Food Photography Basics #2 : Which Camera? What Lenses?
Food Photography Basics #3 : Getting Started
Food Photography Basics #4: It’s All About Light – Exposure
Food Photography Basics #5 : Aperture And Depth Of Field (DoF)

Found this really useful for my food photography course – thanks so much for sharing!
I’m happy you found this tutorial helpful.