
I saw these very pretty Snowflake Cookies at Shelby‘s blog, The Life And Loves Of Grumpy’s Honeybunch. I saw the pictures accompanying her post and knew I had to try my hand at making them. Doesn’t the name of that blog tempt you to go there and take a look? Do hop over and you’ll see lots more than snowflake cookies.
Now, I don’t have snowflake cookie cutters but that wasn’t stopping me. (They’re on my long, long list of things I’m going to ask Santa to bring me in the next few years!)
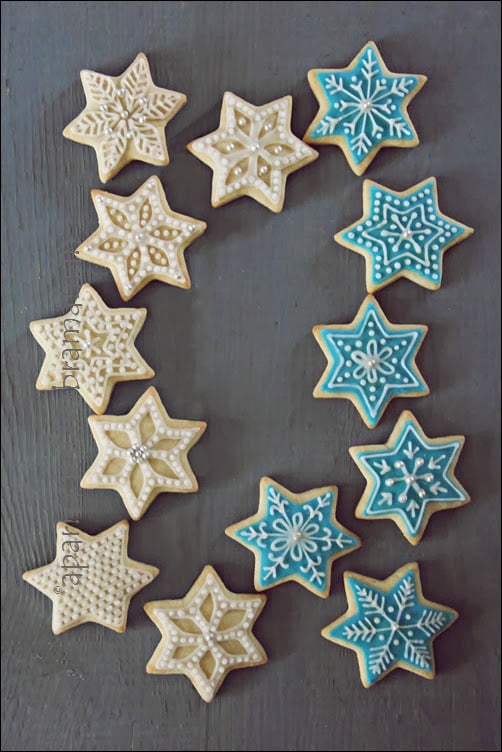
So I dug out my cookie cutters and the one closest to a snowflake was a star shaped one. I now have a 6 pointed star shaped cookie cutter (unlike my old 5 pointed one) though it looks nothing like a snowflake in shape but that’s not a big deal as far as I’m concerned. If it comes to that, it doesn’t ever snow where I live and I haven’t seen snow either (this one’s on my “things I’m going to do some day” list). So I went ahead and made some star shaped snowflake cookies!
These cookies are easy to make but icing and decorating them takes a lot of time to do. I made the cookies on an evening then iced them the next morning and did the final decorating in the evening. After drying overnight, they were ready for packing on the third day.
The cookies are fun to make with children helping to cut out the shapes, but it might be a better idea to perhaps give them a few of their own to decorate and do some by yourself if you’re looking to create some nice looking ones.

I used Nicole’s recipe for Soft Cutout Christmas Cookies as I wanted my cookies to be soft because I don’t particularly like the idea of crisp cookies topped by crunchy icing. Now these cookies are quite soft and cakey in texture and that provided a nice contrast for the layer of sugar icing on top.
I adapted the original recipe to make it egg-free so I left out the egg as I felt the cookie dough had enough fat and leavening agents in it. I also substituted buttermilk with milk and vinegar. I think this also made up for the absence of the egg.
For the icing, I used simple sugar or glace icing. It is eggless and when dry, it becomes shiny and hard and is perfect to pack for gifting. The consistency of the icing is very also very easy to adjust. For thicker icing, add more icing sugar and the icing can be thinned to required consistency by adding milk.
The amounts given below are not enough to ice all the cookies made with the above recipe. I made the icing with 1 cup of icing sugar at a time, first for flooding the cookies and then again for decorating the cookies. I still had cookies which I left plain.
You would need to judge how much icing you need depending on the size of your cookies and how you want to decorate them. This icing is so easy to make that it’s not a problem to make it in two or three batches.
This recipe is adapted from Baking Bites.

Egg Free Snowflake (or Star) Cookies
Ingredients
For the Cookies:
- 1/2 cup butter , softened
- 1 cup sugar
- 1/2 cup milk + 1 tbsp vinegar
- 1/2 tsp baking powder
- 1/2 tsp baking soda
- 1/2 tsp salt
- 2 3/4 cups all purpose flour
- 1 tsp vanilla extract
- 1/4 tsp almond extract (optional)
For the Icing:
- 1 cup icing sugar
- 1/2 to 1 tbsps milk
- 1/2 tsp vanilla extract (optional)
- 1/4 tsp salt (optional)
Instructions
- For the Cookies : Sift together the flour, baking powder, baking soda and salt and keep aside. In a bowl, cream together the butter and sugar. Add the milk and vingar mixture and beat well.
- Add the sifted flour mixture and mix everything till well blended. Divide the dough into two portions, wrap in cling film and refrigerate for at least 2 hours.
- Working with one piece of dough at a time, roll out the dough on a lightly floured surface till 1/4u201d thick. Cut out shapes with a cookie cutter and place on a greased cookie sheet.

- Gather the scraps, roll again and cut out more cookies. If the dough feels sticky refrigerate for about 15 minutes. Repeat with the other piece of refrigerated dough.
- Bake the cookies at 190C (375F) for about 6 to 10 minutes till the edges are firm and the cookies are a pale brown. Cool on a rack.
- For the Icing : Put the icing sugar, salt and vanilla extract in a bowl. I find that little bit of salt balances out the cloying sweetness of icing sugar.
- Add the milk, one tsp at a time, and mix well with a spoon till the icing is of the consistency you require. Add the food colour a drop at a time and mix to achieve the shade of colour you want.
- For flooding the cookie ( that is covering the cookie with the base coat of icing) you will need a slightly thinner consistency.
- I filled a ziplock bag with the icing for flooding my cookies. Cut a very small opening at the end of the bag and trace the outline of the cookie. Then press out a little icing inot the middle of the cookie and using the tip of the bag spread it to fill the outline so the cookie is covered with a layer of icing. Allow this layer to harden. It will take about 4 hours at least.

- Once the base coat of icing is dry, fill another ziplock bag with the icing for decorating and cut off a very small piece from the tip. If the hole at the tip of the bag is bigger, you will get very thick lines of icing on your cookie. Decorate as you desire.
- Allow another 4 hours for the icing to dry and harden. The cookies are now ready to be eaten or packed.

Both the cookies look lovely though I think the first one looks really sweet, and I wouldn’t have even noticed the no. of points in the star if you hadn’t mentioned it!
This is really very creative.And so festive. It looks beautiful.
You are an artist! Wow! such good work at the decoration! I’m your fan now! I always was, actually. :DWhen I bake cookies with flours, I also see no reason why one needs eggs. I also make those which do not require eggs. Look so so beautiful!
I think you are on a cookie spree.Lovely Aparna.
Aparna, you did a lovely job! I’m so happy my cookies inspired you to try too! Thank you for mentioning me 🙂
Wow Aparna.. first the fudge looks really great, but I could not turn my eyes away from the candy canes & the snowflake cookies. the icing u have done is sooo delicately beautiful, and now I am more convinced of the sloppy job I did:-). The candy canes are so cute. I made candy cane cookies too, but they disappeared to schools before i had time to click:-(
WOW Aparna the cookies are lovely….and the fudge looks yummy 🙂
Cute cookies…nice pics
These look so pretty! Wow, just amazing.
They look so pretty, Aparna! You certainly have a lot of patience.
these are gorgeous!!
Pretty pretty! I have like excess snow lying outside my home right now.I wish I could send you some. Seriously.
Wow Aparna, it is gorgeous and I love the colour.
Star shaped snowflakes sound so cute 🙂
Hi,
Hello,
This recipe is fabulous.
I had a question-these cookies can stay well for how long?
for the milk/vinegar ingredient… what is the ratio of the milk to vinegar? i have a student who can’t eat egg and i would love to try your recipe with my class. thank you!!
Sorry there was an error in the recipe formatting. It is 1/2 cup milk + 1 tbsp vinegar.
Hi. Would it produce very different results if made without vinegar?
I used milk and vinegar in place of buttermilk. Leaving out the vinegar would change the texture of the cookie completely. You could use buttermilk instead if you wish to not use vinegar.
How much butter milk to be used in place of milk and vinegar please ?