
I have something of an obsession with decorated cookies. I don’t particularly like eating cookies especially the sweet kind and usually bake them for my daughter or family and friends. Decorating cookies appeals tremendously to my creative side (whatever little there is). So I take every opportunity I get to make decorative cookies which is probably about twice a year. Christmas is definitely one and this year I’m decorating Gingerbread Row House Cookies
If you go through my blog, you can see some of the decorated cookies I’ve made so far and the list includes Decorated Gingerbread Cookies, Egg-free Sugar Cookies (I went to town with these), Gingerbread Men, Egg-free Snowflake Cookies, Blood Splattered Cookies for Halloween, Maltese FigolliCookies, and a Gingerbread House!
I have always loved the idea of Gingerbread Houses. Maybe it goes back t the days as a child when I read about Hansel and Gretel in the forest discovering an edible house decorated with cakes, chocolate and candy. The wicked witch and all the other rather sad parts of that story faded away compared to the illustration of a most beautiful house in my book.

So come Christmas, and I try to work in a project to construct some form of a gingerbread house but I’ve not been very successful with that. Last year we made a Log Cabin last year but I never got around to posting it. This year I did want to make something along the lines of a gingerbread house but it’s an activity that’s fun only if it’s done with someone else. The daughter of the house is away at college and it will be too late to make one with her when she does come down for the holidays.
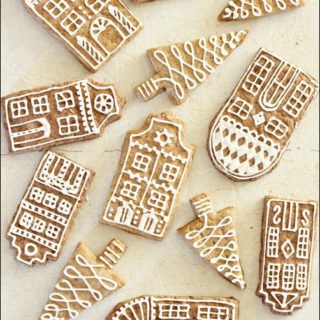
That’s when I remembered Martha Stewart’s Gingerbread Townhouse Cookies a couple of years back. Using that as my inspiration and Martha Stewart’s Townhouse templates for guidance, I made some Gingerbread Row Houses of my own instead, as a sort of compensation for not constructing a regular gingerbread house this time. Instead of one gingerbread house, I have many smaller individual houses that are just as pretty, a lot less work and delicious to boot!
I used a tried and tested recipe of Beatrice Ojakangas . This is a favourite because it is egg-free. More importantly, it does not use molasses which is an ingredient that’s a bit difficult for me to find in stores here.

You can up the quantity of the spices a bit if you want really well spiced cookies. I also divided the dough into half and added unsweetened cocoa powder to one half to make a set of lighter and slightly darker cookies. This is for purely aesthetic purposes and you can omit this step.
I used an egg white based Royal Icing but if you’re looking for an egg-free recipe, please refer to this post. Remember that the egg-free icing does dry and harden but is not as hard as the one with egg white. Please note that this makes about 2 cups of Royal Icing and you will probably need about half to decorate the Row Houses.
Decorated Gingerbread Row House Cookies
Ingredients
For the Gingerbread Dough:
- 100 gm butter , soft at room temperature
- 1/2 cup brown sugar , well packed
- 1 tbsp cinnamon powdered
- 2 tsps ginger ground
- 1 1/2 tsps cloves ground
- 1 tsp baking soda
- 1/4 cup boiling water
- 2 to 2 1/2 cups all-purpose flour
- 1 1/2 tsps unsweetened cocoa powder (optional)
For the Royal Icing:
- 1 egg white large
- 3 cups sugar powdered
- 1 teaspoon lime juice
- 1 teaspoon almond extract
Instructions
- Cream the butter and sugar in a large bowl, using a hand held mixer till well blended. Mix in the spices. Mix the baking soda with the boiling water and add it to the dough along with the flour. Mix well into a stiff dough. If necessary add more water, a tablespoon at a time to get to the required consistency of dough. If using the cocoa powder, divide the dough into two portions. Chill the dough for at least 4 hours or overnight.

- Draw the patterns for the row houses on cardboard using these templates, and then cut them out.
- Take the dough out and leave it on the counter top for some time so that it softens up a little and becomes easier to work with. Divide the dough into two or three portions and work on one portion at a time. Roll out the dough on a floured work surface to about 1/8" thickness. Place the cardboard templates on the dough and cut around them with a sharp knife.
- Transfer the cut out shapes to lightly greased or parchment lined baking sheets. Repeat with the remaining dough. Gather together the scraps, roll out and cut as many shapes as possible out of them.

- Bake the cut outs at 190C (375F) for 15 to 20 minutes until the dough feels firm to touch. Leave them to cool on the baking sheet and they will become harder. When theyu2019re completely cool, decorate them with Royal icing.
- To make the Royal Icing, beat all ingredients until smooth, adding the powdered sugar gradually to get the desired consistency. If not using the Icing immediately, keep it in a small bowl, loosely covered with a damp towel for a few hours until ready to use. Otherwise transfer to an airtight plastic container, place clingfilm over the surface to prevent crusting and cover. Refrigerate.
- If it does crust slightly, beat it slightly to get it an even consistency. This Icing should keep in the fridge for 4 to 5 days.

I remember the first time I saw decorated cookies on your blog – they were so beautiful, as these are! And I was surprised to see Beatrice Ojakangas’ name here, I have a book of desserts by her.
Thanks Sravanthi. I happen to have 3 of her books and I generally find her recipes work for me.